Most of us have a habit of keeping using the same password for a long time. Its dangerous, mainly if the password is in use at multiple places. It is possible that in a security breach, the password was open to all. So today, in this post, we will share how you can set a
Password Expiration Date for your
Microsoft Account or
Local Account. It will force users to change the password every few months.
Here are we are setting password expiration for two different types of accounts. Microsoft Account, and the Local Windows account. If you are using a Microsoft account in Windows 10, then it becomes even more critical that you change it from time to time.
When we say Set password Expiration Date, you can either choose what Windows offers for local accounts or set using the net command.
Set Password Expiration Date for Microsoft Account Go to Microsoft Account Security section
Click on
Change my password link under Password security
Enter the old password and the new password twice
Check the box which says Make me change my password every 72 days
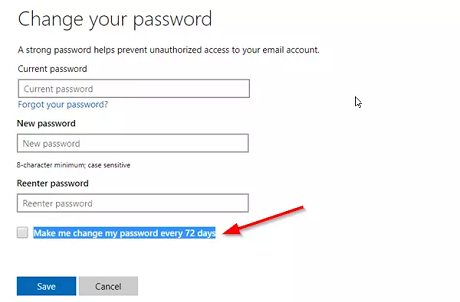
The only drawback of this method is that you need to change the current password to one which you havent repeated the past three times. Microsoft will then automatically prompt you to change the password every 72 days.
You should know that this is different from PIN or Windows Hello, which you use on Windows 10 computer.
Set Password Expiration Date for Local AccountWhile it is possible to create a password-less account in Windows 10, its not a good idea. If you are the admin user of your computer, make sure all users change their password often. There are two ways of doing this, and it will force users to change their current password. The default is 42 days.
Using User accounts interface
1. In the Run prompt (Win + R) type
lusrmgr.msc followed by pressing the Enter key.
2. It will open Local Users and Groups Editor
3. Under Users folder, locate the user for which you want to change the password expiry
4. Double click to open the user properties
5. Uncheck the box which says
Password never expires6. Click on the OK button to complete the process
There is a popular WMIC command, but it seems to be not working in Windows 10. If you use the command without the where name clause, it will set Password Expiration for all the accounts, including system accounts.
wmic UserAccount where name='John Doe' set Passwordexpires=false
Command-Line Options to set Expiration DateOnce done, if you want to
set an exact expiration date, then you need to use the Net Accounts command. Open PowerShell with Admin privileges, and execute the command Net Accounts. It will reveal details as below:
Force user logoff how long after time expires?: Never
Minimum password age (days): 0
Maximum password age (days): 42
Minimum password length: 0
Length of password history maintained: None
Lockout threshold: Never
Lockout duration (minutes): 30
Lockout observation window (minutes): 30
Computer role: WORKSTATION
If you want to set a particular expiration date, then you will have to calculate the figure in days. If you set it to 30 days, users will have to change their passwords once a month.
Execute the command Net Accounts /maxpwage 30
If you want to force someone to change the password instantly, you can use
maxpwage:1Use Group Policy to change Password Expiration Date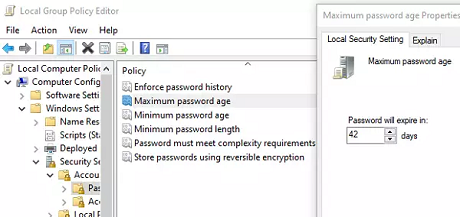
Open Group Policy Editor by typing
gpedit.msc in the Run prompt followed by pressing the Enter key
Navigate to Computer Configuration >
Windows Settings >
Security Settings >
Security Settings >
Account Policies Click on Password Policy, and then click on
Maximum Password age Here you can change from 42 to any figure you like. The maximum is in between 1-999
source