Security should always be at the top of the priority list, especially when it comes to your online accounts. One that you need to make sure youve secured is your Google account.
You may think there is no reason to use advanced security measures to protect your Google account, but if a hacker or someone with bad intentions ends up with access to your account, it can spell bad news for your finances and your personal information.
You need to make sure to take all of the possible measures to secure this account, which includes changing the three settings below.
Begin with a Security CheckupBefore you get started with making any changes to secure your Google account, though, you should run the
Security Checkup to get recommendations from Google. This service lets you see if your Google account is safe by checking for issues that could impact your accounts security.
We ran it to see what, if anything, would come up for our account, and a surprising amount of potential security issues were noted. We needed to update our backup email and phone number in case we were locked out of our Google accounts, and there were a couple of issues noted with the devices we were using to sign in.
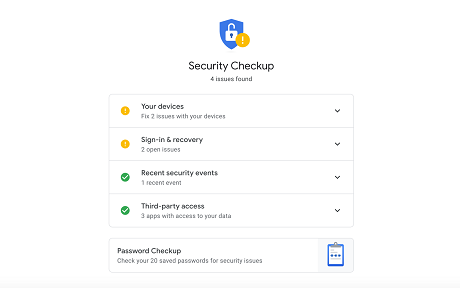
It didnt take much to fix the issues Google makes it simple to correct any potential security gaps right from the results page for Security Checkup, so running this service and fixing potential issues likely wont take much time.
Once youve run and fixed any issues with Security Checkup, you should focus on fixing a few other settings in your Google account, including:
1. Use a strong password and 2-step verificationAs with any account, you need to use a strong password for your Google account and set up two-factor authentication (2FA). There are several ways you should be creating strong passwords, including using all of the character options youre given. You can find more tips for creating strong passwords by
tapping or clicking here.
But while setting up a strong password is paramount to securing your account, so is using 2FA on your Google account. This type of verification process uses a multi-verification approach when you sign in to validate that you are the person who should be accessing the account.
For example, when you log in to your Google account with 2FA, a code will be sent to your phone via text or the
Google Authenticator app to verify your identity. This not only secures your account against hackers and other people who shouldnt access it but also makes your password recovery a breeze if you forget your login.
To turn on Google 2FA:
1. Go to your
Google Account.
2. On the left navigation panel, click
Security.
3. On
Signing into Google panel, click
2-Step Verification.
4. Click
Get started.
5. Follow the steps on the screen.
2. Set recovery options in your Google accountOnce you have your 2FA turned on for your Google account, youll need to set your recovery options in case you forget your password or switch devices. Your recovery options ensure that you can get back into your Google Account or change the password if you forget your password, someone else is using your account, or you get locked out for some other reason.
All you have to do to set this up is add an email or phone number to your Google account, which Google will use to verify you if you cant log in for any reason.
To set the recovery phone and email options on your Android phone:
1. On your Android phone or tablet, open your devices
Settings app >
Google >
Manage your Google Account.
2. At the top, tap
Security.
3. Under
Ways we can verify its you, tap
Recovery phone. You
might need to sign in.
4. From here, you can:
○ Add recovery phone.
○ Change your recovery phone: Next to your number, select
Edit.
○ Delete your recovery phone: Next to your number, select
Delete.
5. Follow the steps on the screen.
1. On your Android phone or tablet, open your devices
Settings app >
Google >
Manage your Google Account.
2. At the top, tap
Security.
3. Under
Ways we can verify its you, tap
Recovery email. You might need to sign in.
4. From here, you can:
○ Add a recovery email.
○ Change or delete your recovery email: Next to your email, select
Edit.
5. Follow the steps on the screen.
To set a recovery phone and email options on your iOS device:
1. On your iPhone or iPad, open the Gmail app.
2. Tap Menu Menu and then settings and then your account and then manage your Google Account. If you dont use Gmail, go to myaccount.google.com.
3. At the top, tap
Security.
4. Under
Ways we can verify its you, tap
Recovery phone.
5. From here, you can:
○ Add recovery phone.
○ Change your recovery phone: Next to your number, select
Edit.
○ Delete your recovery phone: Next to your number, select
Delete.
6. Follow the steps on the screen.
1. On your iPhone or iPad, open the Gmail app.
2. Tap
Menu >
Settings >
Your Account >
Manage your Google Account.
3. At the top, tap
Security.
4. Under
Ways we can verify its you, tap
Recovery email.
5. From here, you can:
○ Add a recovery email.
○ Change or delete your recovery email: Next to your email, select
Edit.
6. Follow the steps on the screen.
To set recovery email and phone options from your computer:
1. Go to your
Google Account.
2. On the left navigation panel, click
Personal info.
3. On the
Contact info section, click
Add a recovery phone to help keep your account secure.
4. From here, you can:
○ Add recovery phone.
○ Change your recovery phone: Next to your number, select
Edit.
○ Delete your recovery phone: Next to your number, select
Delete.
5. Follow the steps on the screen.
1. Go to your
Google Account.
2. On the left navigation panel, click
Personal info.
3. On the Contact info section, click
Email.
From here, you can:
○ Add a recovery email.
○ Change or delete your recovery email: Next to your email, select
Edit.
5. Follow the steps on the screen.
3. Review the devices connected to your accountYoull also need to check and see which devices are connected to your Google account. Finding and removing old or unknown devices from your account will help secure your information and keep people from accessing your account via devices you didnt know were associated with your account.
To review the devices that are connected to your Google account:
1. Go to your
Google Account.
2. On the left navigation panel, select
Security.
3. On the Your devices panel, select
Manage devices.
4. Youll see devices where youre currently signed in to your Google Account. For more details, select a device.
To sign out of a device:
1. Go to your
Google Account.
2. On the left navigation panel, select
Security.
3. On the
Your devices panel, select
Manage devices.
4. Select the device and then
Sign out.
To secure your account (in case of unrecognized devices):
1. Go to your
Google Account.
2. On the left navigation panel, select
Security.
3. On the
Your devices panel, select
Manage devices, and then
Dont recognize a device?
4. Follow the instructions.
Bonus: Use Googles Advanced Protection Program
Another security measure you can use to secure your Google account is the Advanced Protection Program, which adds Googles strongest layer of security to your account.
Advanced Protection uses security keys to help protect emails, documents, contacts, or other personal data, and its recommended for anyone who is at risk of targeted online attacks such as journalists, activists, business leaders, and IT admins.
The one caveat is that you can only turn on Advanced Protection immediately if you use the built-in security key of an eligible phone. If you dont have an eligible phone, youll need to purchase your security keys first and then turn on Advanced Protection.
To find out more about Advanced Protection or for complete instructions for turning on this feature, you can visit
Googles Advanced Protection support page.
source