Recent Posts
21
Browsers: Google Chrome | Opera | Safari | Firefox / Chrome installed a 4GB AI model on my computer without asking me
« Last post by javajolt on May 25, 2026, 08:44:59 PM »
Chrome is no longer the lightweight browser most people think it is. And if you dont believe me, just check the storage Chrome is taking up on your PC. Recently, a lot of users have reported Chrome silently downloading a 4GB file on their PC or Mac. And when I checked on mine to confirm, sure enough, it was sitting there too.
What makes the whole situation frustrating is that Google doesnt ask for any permission before downloading it. Theres no pop-up or even an explanation before the download. The good thing is, Chrome does let you remove the file and reclaim the storage space. But once you understand what the file actually does and why Chrome needs it, you probably wouldn't want to do it.
AI downloads this large deserve an opt-in prompt
They shouldve asked first
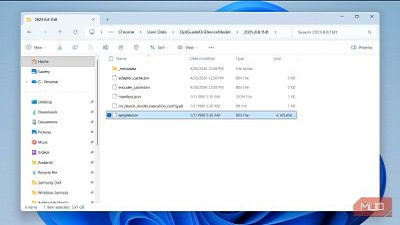
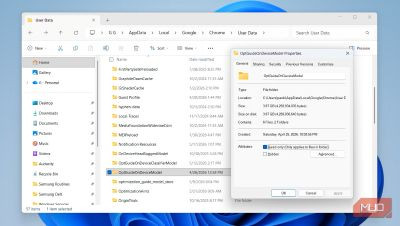
If you have Chrome installed on your PC or Mac, theres a chance a massive file named weights.bin is sitting on your storage drive and taking up nearly 4GB of space. I wouldnt blame you for not knowing this, because it's a file Chrome downloads silently. You can find the file in Chromes directory.
macOS: /Library/Application Support/Google/Chrome/OptGuideOnDeviceModel/
Windows: %LOCALAPPDATA%\Google\Chrome\User Data\OptGuideOnDeviceModel
This file is essentially the brain behind Chromes on-device AI system, also known as Gemini Nano. In simple terms, it contains the machine learning model that allows Chrome to run certain AI features locally on your PC instead of sending requests to Googles cloud servers.
These AI models help with things like generating text, summarizing an article, and warning you about potential scams. So yes, its kind of important. But the problem is the storage it takes, and more importantly, Chrome doesnt really ask for consent before downloading a file this large. As soon as you interact with a feature that relies on these AI models, it simply downloads the file silently.

Googles reasoning doesnt completely convince me
I understand the logic, but I still dont like it
To be fair, Google has stated legitimate reasons for putting Gemini Nano directly on your PC. According to Google, the local AI model powers important features without constantly sending your data back and forth to the cloud. In theory, thats better privacy, as some AI tasks happen entirely on your device instead of Googles servers.
Theres also a practical reason behind this. Running AI models in the cloud is incredibly expensive. Every AI query costs computing power, electricity, and server resources. By shifting some of that workload onto your PC or Mac, Google can reduce the pressure on its own infrastructure while still offering important AI-powered features.
But personally, I still dont think it fully justifies Google downloading the file without user consent. While Google does mention that the model is supposed to automatically uninstall itself if the device starts running low on storage, theres no clarity on what that low storage" number actually is.
Yes, you can delete it, but theres a catch
Do you really want to?
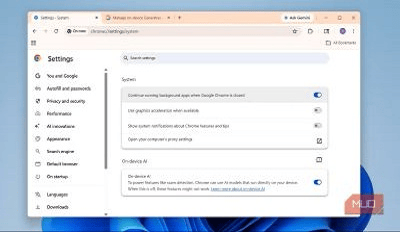
Technically, its possible to get rid of the weights.bin file from your PC or Mac. Its really no different from deleting any other file, and doing so doesnt affect your browsing data. The problem is that Chrome will simply redownload the same file and occupy storage space. The only way to reclaim that 4GB permanently is to disable Chromes on-device AI features. To do that, open Chrome Settings, switch to the System tab, and turn off On-device AI toggle.
Once disabled, the on-device AI file will disappear automatically, and it wont come back. Of course, theres an obvious downside to this. Removing the weights.bin file also means giving up on Chrome's AI features, which include things like summarizing pages and even scan protection tools. And thats what makes this whole situation complicated.
absolutely dislike the idea of Chrome silently placing a 4GB AI model on my PC. But at the same time, using a browser without these features in 2026 also feels limiting. So yes, if Chrome had simply shown me the prompt, Id have clicked Yes anyway, mainly because some of this model also powers security features.
As someone who practically lives inside a browser all day for work, it doesn't make sense to remove Chromes local AI model just to free up some storage space. That said, Ill be keeping an eye on the file to make sure it doesnt quietly balloon in size as Google continues to add new AI features. If you dont like the idea of Chrome using this much storage, though, its better to switch to a different browser entirely, like Edge, Brave, or any of the other open-source alternatives thats far more lightweight.
source