Whether you're leaping directly from Windows XP to Windows 7 or you stopped in Vista territory along the way, you'll find that the latest version of Microsoft's operating system handles media files in several new ways. The methods for photo and video importing, editing, and exporting have been all updated. You have new options for sharing and streaming files between computers. And media libraries become more-versatile vessels for finding and managing media files. I'll explain how to get started with these and other entertainment features of Windows 7.
Check Out the LibrariesWindows 7 manages media files differently than previous Windows OSs did. It retains the familiar Pictures, Videos, Music, and Documents folders, but you can assign additional library locations in order to collect your media files more dynamically.
The libraries in Windows 7 organize file types to help applications find media more easily. By default, programs look to the Pictures, Videos, Music, and Documents folders instead of having to scrutinize your whole disk. Windows XP and Vista tied media libraries to those specific folder locations. For example, Windows Media Player watched vigilantly over C:\Users\[username]\Music. Then, anytime you added new audio files to that folder, Media Player showed them in your music library. If you wanted Media Player to look for media in other areas--say, in the iTunes music folder or in another user's music library--you had to add the new locations manually within the program.
In Windows 7, the Pictures, Videos, Music, and Documents folders are not the only doors into those libraries; you can add any other disk location you like, and library-savvy applications will automatically pool media wherever it's stored.
Add Libraries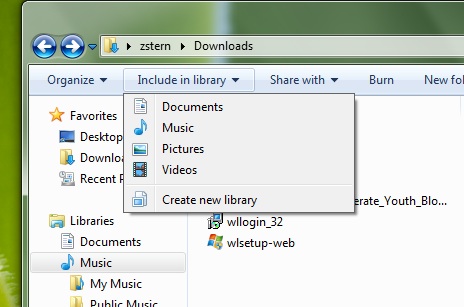 Use the 'Include in library' menu to add any folder to your media libraries.
Instead of manually curating media in the traditional user folders, you can turn any folder into a library. Applications will know where to find media, and you can keep your computer organized in whatever way you want.
For example, you can turn a networked folder into an auxiliary library, or even pool music files from a different user on the same PC. Or transform your Downloads folder into a library, instantly putting MP3 and video downloads into media applications. Here's how (the process is the same for any of these situations).
Open the Start Menu, and click your username. Open the
Downloads folder, and pick
Include in library, Music. Then select
Include in library, Movies. Henceforth, without your having to open them immediately after downloading them, your PC will automatically slurp music and movie files into Windows Media Player.
To remove the library status of a folder, open a window in the desktop and then navigate to that library folder in the left pane. In our case, the menu path is
Libraries, Music, Downloads. Right-click the library-enabled folder--
Downloads--and choose
Remove location from library.
Get Windows Live Essentials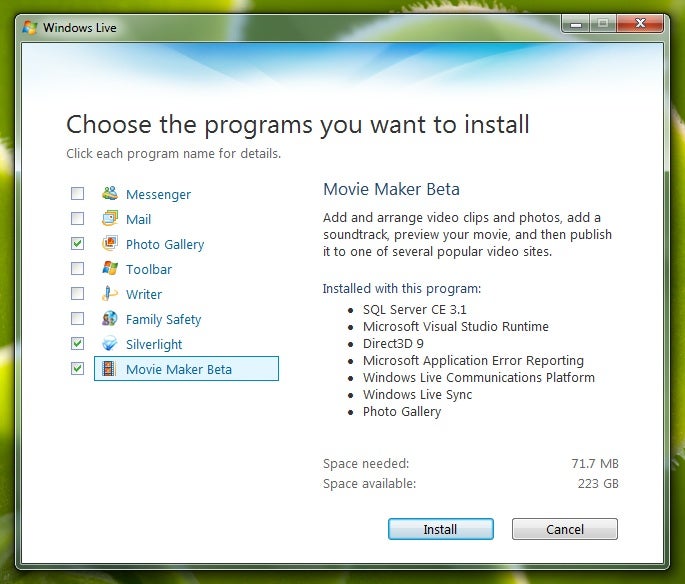 If you are interested in additional software, click options beyond Movie Maker and Photo Gallery.
Windows 7's standard installation omits some previously bundled Windows software, including Photo Gallery and Movie Maker, but you can still download these apps at the
Windows Live Essentials download page. Click
Download on the right side, and save and run the file.
In the installer, mark the checkbox for each piece of software you want to add. If you're on the prowl for useful multimedia options, check
Photo Gallery, Movie Maker Beta, and
Silverlight. (You're likely to encounter Silverlight video-streaming sites such as Netflix, so you might as well add it to Windows 7 now.) Click
Install, and after several minutes, okay the final prompts to exit the installation. (I skipped changing my default home page and other needy-relationship-style requests.)
You can sign up for a Windows Live ID if you wish, or just click
Close. Windows 7 uses the ID to share photos and other media online--and you'll want one for streaming files over the Internet--but it's not required for most application features.
Import Pictures and Video Into Windows Live Photo Gallery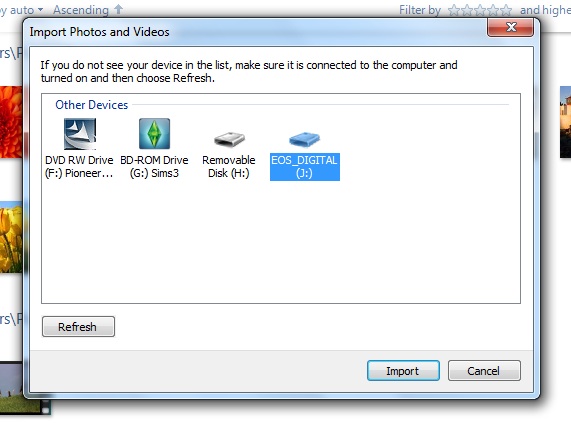 Click the links to view all of the items, if you want to import pictures selectively; otherwise, click the left checkbox to add the full group.
The procedure for importing images or video in Windows 7 is straightforward: Launch Windows Live Photo Gallery, and introduce your image source (by plugging in a camera, inserting a Flash card, loading a disc of pictures, or whatever). Choose
File, Import from camera or scanner. Select the image source, and click
Import.
The import option lets you pick items individually and even group them by date and time if you wish. The
Adjust groups slider at the bottom of the screen lets you divide several photo (or video) sessions in one day by reducing the amount of time allotted to a single group. As a result, if you shot vacation photos at a cathedral in the morning, took a break at lunch, and then resumed snapping later, you can import the two series of photos separately.
Use these groupings to your advantage. Click
Next and then click
Add tags next to any of the groups. Enter a few keywords from that particular photo session, separating them with semicolons. Click
Import.
If you shot RAW files, the program may prompt you to download and install an additional codec. I had to go through that process to accommodate photos from my digital SLR camera; but once you've installed the extra piece of software, Windows 7 can display the higher-end RAW files in the same manner as it does JPEGs.
Publish a Photo Gallery Online If you want to publish a subset of the images in a folder, selectively click those items while holding down Ctrl.
Your friends and family can view your photos through the Windows Live site. After importing and arranging an album, you can upload the images within Windows Live Photo Gallery.
Within that application, right-click
My Pictures, and pick
Create new folder. Name the new folder. Drag in pictures that you want to publish online. Click the name of the folder within the main window near the top to select all of the pictures. Choose
Publish, Online album. Sign into your Windows Live account if needed.
Give the album a title and in the pop-up menu choose who can view the pictures. Change the value for 'Upload size' in the pop-up menu if you wish;
Medium gives enough detail for Web viewing;
Large and
Original allow ample size for displaying on a big TV, printing, and otherwise downloading. Then click
Publish.
After the photos have finished uploading, the program will prompt you with the option to view them. Click
View Album to open the page in your Web browser. If you miss that option, click your account name in the upper right corner of Windows Live Photo Gallery, and select
View your photos. Copy the link from the Web page, and share it with your friends.
If you decide to limit who can see one of your albums, visit that album's Web page, and click
Shared with:
Everyone (public) at the bottom of the page. Click
Edit Permissions on the following page, and uncheck the
Everyone (public) box. If you've made friends through the Network area of Windows Live, pick the
My network box instead. Otherwise, you can add individual e-mail contacts at the bottom. (Press the spacebar to speed up entry of the next address.)
Back in Photo Gallery, you can add more photos to a published group by selecting the new pictures and choosing
Publish, [gallery name]. Hold
Shift and click the first and last images to select pictures in sequence, or hold down
Ctrl and click pictures to group them in any order you like.
Import Photos and Videos Into Windows Live Movie Maker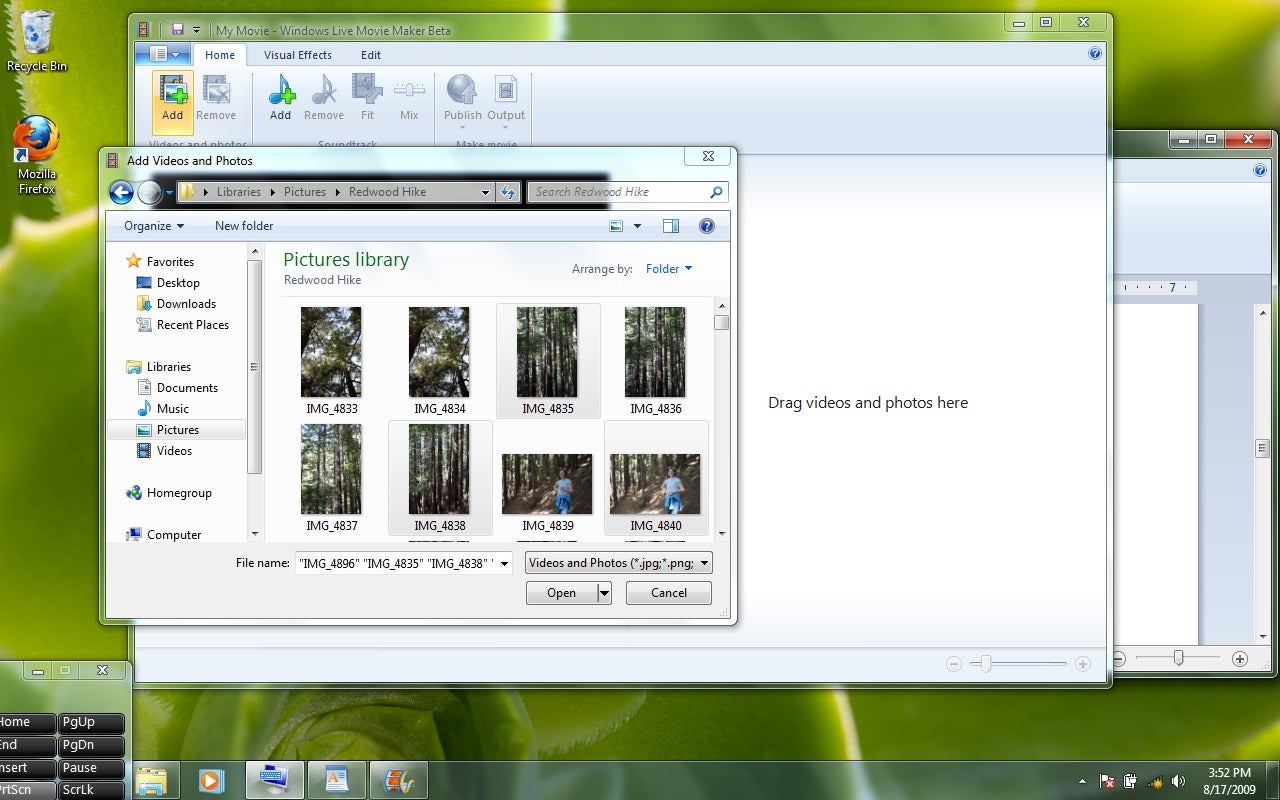 In addition to importing videos into Windows Live Movie Maker, you can import photos to create multimedia family productions.
Windows Live Movie Maker eschews video capture tools in favor of relying on the rest of Windows 7. If you connect a DV camcorder to a Win 7 PC, the capture process should automatically launch outside Movie Maker.
Click the
Import the entire video radio button, enter a name, and click
Next. Click the
Import videos as multiple files checkbox, and the tool will splice the tape into your individual shots. Approve the next windows to import the tape; the importing process will take exactly as much time as your footage does to play.
Once your PC has captured your media, you have some options for adding clips to a video in Windows Live Movie Maker. From the desktop, drag your photos and videos into the right pane in that program. If that area is blocked, drag the files over the Movie Maker icon in the Taskbar, continue to hold the mouse down, and then drop them into the right pane. Alternatively, select
Add above Videos and photos in the software, select the media, and click
Open.
You'll want to rearrange and trim various clips during the editing process, but at this point all of them are part of your movie. If you added too many clips or images, delete them from the storyboard by clicking the files and then clicking
Remove.
Edit Your Movie Drag the sliders to trim a video's length, keeping only the best parts.
Windows Live Movie Maker cuts the timeline view, focusing instead on arranging clips in a storyboard. Just drag and drop each clip and each image to place them in the desired order within the right pane. Since some video clips run too long, you'll need to trim them into shape.
Click a video clip to select it; then click the
Edit tab at the top of the window, and click
Trim. At this point, you can adjust the in- and out-point sliders (which govern the length of the clip, by trimming from one or both extremities) at the beginning and end of the timeline. Press the spacebar or click the
Play icon to view a sample from the full clip, playing only between the edited points.
If you're satisfied, click
Save and close to finish. You'll make the edit here, but the original video file will stay the same, in case you want to reimport it later.
You can expand or contract the length of time that an image shows, too. Within the Edit tab, click the photo and adjust the value for
Duration. Click the
Home tab to return to the main view.
Publish Movies to YouTube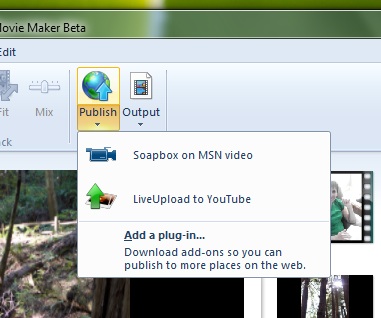 A free plug-in called LiveUpload lets you send movies straight to YouTube from MovieMaker.
Windows Live can host your finished movie at Microsoft Soapbox, enabling your friends and family to view it from their Web browsers. But if you already have a YouTube presence, you can add a plug-in called LiveUpload to upload to that site from within Movie Maker.
Visit the
LiveUpload page, and click
Download Now to grab the plug-in. Save and run the file, following the installer's instructions; the installation takes just a few seconds.
Restart Movie Maker, open the
Home tab if needed, and press the bottom half of
Publish. (Click on the word or below it.) Select
LiveUpload to YouTube. Enter your username and password, and click
Sign In. Enter a title, add a description, and complete the other details; then click
Publish. Movie Maker will prepare the movie and upload it to your YouTube account. The process may take anywhere from several minutes to more than an hour, depending on the length of the video.
Source: PCWorld.com