
With Windows 10 now out of support, more users are considering upgrading to Windows 11, which is infamous for its steeper hardware requirements, with mandatory stuff like Trusted Platform Module (TPM) and Secure Boot. We have a dedicated guide that explains how to check if your computer has the necessary TPM version, and now is the time to look at Secure Boot.
Secure Boot was introduced in 2012 with the release of Windows 8. It is part of UEFI, and its goal is to ensure your computer boots with signed and trusted firmware and bootloader. These days, it is hard to find a modern PC that does not support Secure Boot, but the thing is that many devices have Secure Boot disabled by default. In the Windows 10 era, it was not a problem, but now, you might not be able to upgrade to Windows 11, just because Secure Boot is turned off.
Secure Boot is now also mandatory for certain games, as more advanced anti-cheat software relies on low-level features. For example, the latest Call of Duty and Battlefield games won't start if your computer has no TPM and Secure Boot enabled.
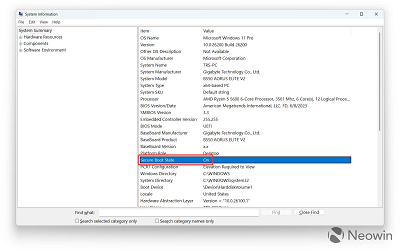
How to check if Secure Boot is enabled?A quick and easy way to check if your computer has Secure Boot enabled is to press
Win + R and type
msinfo32. Press Enter, then look for
Secure Boot State on the default
Hardware Overview tab. If it says
On, then Secure Boot is enabled, and you do not have to do anything.
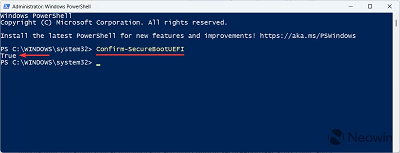
Alternatively, run PowerShell as Administrator and type
Confirm-SecureBootUEFI. Press Enter, and it will return either True (SecureBoot enabled) or False (SecureBoot disabled).
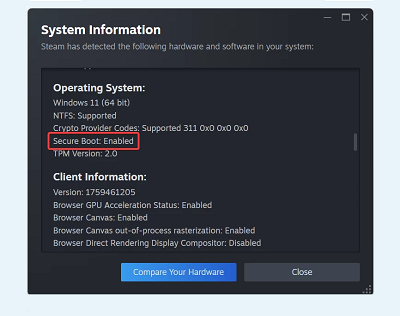
If you have Steam installed, you can check the Secure Boot state by launching the Steam client and clicking
Help > System Information. Scroll down to the
Operating System section and check Secure Boot.
 Neowin
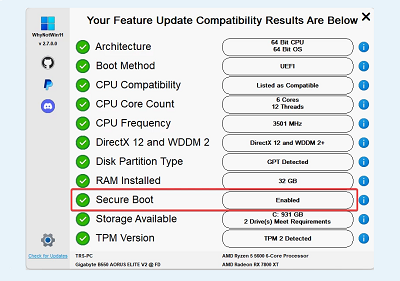
Another way to check Secure Boot is the small third-party app called WhyNotWin11. You can
download it from GitHub for free, and it will scan your computer and check compatibility with Windows 11's hardware requirements, including Secure Boot.
 Neowin
What I like about this app is that not only does it show whether your system is supported or not, but it also provides additional information and insights on what you can do if a certain component is not compatible with Windows 11. It is a very handy thing for inexperienced users.
How to enable Secure Boot?If Secure Boot turned out to be disabled on your computer, the only way to turn it on is to go to BIOS/UEFI settings (UEFI technically is not BIOS, but in modern days, these two terms have become interchangeable).
Restart your computer and enter UEFI (most motherboards have the UEFI key on Del, and if it does not work for you, refer to your PC's user manual). A lot of modern motherboards have a simple and "expert mode," with most of the advanced features, including TPM and Secure Boot, hidden in the expert mode. Switch to the latter if your motherboard has one.
Different motherboards have different UEFI user interfaces, and because of this, I cannot list all of them. However, the rule of thumb is to look for Boot settings. These are usually placed in a separate tab where you can change boot device, boot order, and boot settings. Look for
Secure Boot and enable it. Then, save changes and restart your system.
Important: If you have only Windows on your computer and it is unmodified, enabling Secure Boot will not affect your existing installation. However, on dual-boot systems with Linux installed alongside Windows or custom/modified Windows copies, enabling Secure Boot may result in boot issues.
Now you can check the Secure Boot state once again using any of the previously mentioned methods. If Secure Boot was the only reason why you could not update to Windows 11 or launch a new game, the upgrade path should now be open, and your games should run without issues.
source