Recent Posts

Pages: 1 [2] 3 4 ... 10
11
Dust buildup is bad for your system, so you should regularly clean your PC tower to keep it free of dirt and grime


Cleaning is a crucial part of the PC maintenance routine, and we can't stress how important it is to regularly dust and clean your PC tower. If you ever peek inside your PC's chassis, and you see piles of dust gathered around the internals, then that's not a good sign. We say that because the dust and grime that's collecting on your PC's power and its internals are not only tarnishing its looks, but they're also significantly affecting your PC's performance by reducing the thermal efficiency of your system.

Even the best PC cases will eventually accumulate enough dust to start impacting your system's performance, so it's important to ensure you're getting rid of the dust frequently. While the process of cleaning your PC tower may sound rather tedious, this step-by-step procedure will help you selectively clean the components that are prone to collecting a lot of dust during everyday usage.

What you’ll need

The prerequisites

Most PC cases use thumbscrews to keep the front and back panels in place, but you’ll need a Phillips screwdriver if you plan to unmount the components during the cleanup procedure.

As for the cleaning tools, you’ll need a can of compressed air to get rid of all the dust and debris on your components. Additionally, you’ll need some isopropyl alcohol wipes to properly clean the non-fragile PC parts. You can technically use rubbing alcohol, but I would advise against it as rubbing alcohol contains more traces of water, which can harm your PC's internals. As such, you should typically use isopropyl alcohol with over 90% alcohol concentration when you clean your PC.

Before you begin

Prepare your PC for a clean-up

There are certain steps you should take to ensure that you don't harm yourself or your PC during the cleanup procedure.

1. Turn off your PC and unplug all the cables connected to it.

2. Press and hold the power button for at least 20 seconds to drain all residual power from the PSU.

3. Move the PC tower to a well-ventilated area to ensure that the dust does not settle back into your rig after you finish cleaning it.

4. Remove the front and side panels after loosening the thumb screws that hold them in place.

How to clean the dust out of your PC tower

A step-by-step guide

Cleaning your PC is a lot easier than you think because dust tends to gather around the fans and on the surface of the components instead of settling inside the parts. The most dust-attracting components of your PC are the dust filters, cabinet fans, GPU fans, and the CPU cooler, so you should focus on these parts during the cleanup procedure.

1. Start by removing the dust filters from your cabinet and cleaning them with isopropyl alcohol wipes.


2. Use a compressed air duster to get rid of the dirt and dust accumulated on the case fans. Alternatively, you can use a microfiber cloth to gently clean them, but you'd want to detach them from the cabinet to avoid damaging them.


3. Next up is the GPU. While you can remove most of the dust from your GPU by simply blowing air on it using a compressed air duster, I’d recommend removing the GPU from the case for thorough cleaning. Detach the PSU wires from the GPU, loosen the expansion slot screws securing it in place, and gently unmount the GPU while pressing down on the PCIe latch.

4. Using a finger or a toothpick, hold the GPU fans in place while you clean them with the compressed air can.


5. If the RAM sticks have some dirt gathered around them, you can blow it away using the compressed air duster.

6. If you want to properly clean the dust off your CPU's cooler, you’ll have to detach the fan from the heat sink. Some CPU fans are attached to the heatsink via latches, allowing you to easily disconnect them, while others require you to unmount the entire cooler from the CPU before you can separate the fan from the heatsink. Consult its manual before going ahead with the unmounting process. Use the same procedure you followed when cleaning the GPU fans to dislodge dirt and grime from the CPU fan and heatsink.

It only takes a few minutes to clean the PC tower regularly


Although your PC is now dust-free, you’ll notice that it’s left in a disassembled state. Once you’re done putting your rig back together, be sure to regularly clean the dust filters every other week and the cabinet fans every three months to prevent dust from gathering inside your PC tower. Cleaning them every once in a while will also help improve your system temperatures.

If you want to improve your PC's thermal efficiency even further, consider looking into the cases with the best airflow. You may be inclined to believe that more airflow is synonymous with increased dust accumulation, but many of these cabinets have dust filters around the intake fans to ensure they don't get clogged with dirt.

source
12


Microsoft Sniping tool has been available for Windows users to screenshot their display. The Sniping tool does not often get new updates like other features. However, Microsoft has now added a new and attractive feature to the Sniping tool. According to a tweet by PhantomOcean3, Microsoft has discreetly integrated the Bing search feature into the Snipping tool.  This was spotted while digging through Windows 11 version 11.2404.37.0. This addition, although not officially announced by Microsoft, brings a new dimension to the functionality of the snipping tool. It offers users a convenient way to conduct visual searches directly from their screenshots.


WHAT IS THE SNIPPING TOOL?

The Snipping Tool is a versatile screenshot utility developed by Microsoft, initially introduced in Windows Vista and subsequently included in Windows 7, Windows 8, Windows 10, and Windows 11. This tool allows users to capture screenshots of various elements on their screens, such as open windows, rectangular areas, free-form areas, or the entire screen. The captured snips can be saved as image files in formats like PNG, GIF, or JPEG, or as MHTML files. Also, users can email the snips directly from the tool.

Before Windows Vista, the Snipping Tool, originally known as the Clipping Tool, was part of the Experience Pack for Windows XP Tablet PC Edition 2005. Over the years, the tool has undergone enhancements and updates, with significant changes introduced in Windows 10 version 1809 with the introduction of Snip & Sketch. This newer version offered a more modern interface and additional functionalities, such as the ability to annotate screenshots.

The Snipping Tool provides users with different capture modes, including Free-form Snip, Rectangle Snip, Window Snip, and Full-screen Snip. Users can select the desired mode based on their specific screenshot requirements. Once a snip is captured, users can annotate it using coloured pens, an eraser, or a highlighter. The tool also allows for basic image editing within the application.

The Snipping Tool is easily accessible through the Start menu on Windows systems, where users can search for it by name. Additionally, users can create shortcuts for quick access to the tool, enhancing convenience and efficiency when capturing screenshots. The tool’s user-friendly interface and straightforward functionality make it a popular choice for users looking to capture and annotate screenshots seamlessly.


UNVEILING THE HIDDEN FEATURE

Users of the Windows 11 screenshot tool can access the Bing search feature by simply right-clicking within the tool’s menu, where they will find the option “Visual search with Bing.” This feature mirrors the capabilities of Google Lens, enabling users to identify objects within images and search for relevant information on the web. The integration of this feature adds a layer of interactivity and utility to the snipping tool, enhancing the overall user experience.

While Microsoft is currently limiting access to this feature by inviting select users for testing, they have provided an alternative solution for all Windows 11 users. By copying and pasting screenshots into the Copilot window, users can leverage AI technology to perform image searches. This alternative method ensures that all users can benefit from the functionality of visual search, even if they are not part of the initial testing group.

The inclusion of the Bing search feature within the Windows 11 snipping tool represents a significant step towards enhancing user experience and productivity. By enabling users to seamlessly search for information related to objects within their screenshots, Microsoft is streamlining the process of gathering relevant data and insights. This feature not only saves time but also opens up new possibilities for utilizing screenshots in a more interactive and informative manner.

COMPARISON TO GOOGLE LENS

The similarity between the Bing search feature in the Windows 11 snipping tool and Google Lens lies in their shared objective of identifying objects within images and providing users with relevant web-based information. While Google Lens has been a popular tool for visual searches, Microsoft’s integration of a similar feature within the snipping tool brings this functionality directly to Windows 11 users, eliminating the need for third-party applications.


The addition of the Bing search feature to the Windows 11 snipping tool hints at Microsoft’s commitment to innovation and user-centric design. By continuously enhancing the capabilities of their tools and software, Microsoft is setting a precedent for seamless integration of AI-driven features that cater to the evolving needs of users. This move not only improves the functionality of the snipping tool but also sets the stage for further advancements in visual search technology within the Windows ecosystem.

CONCLUSION

In conclusion, the integration of the Bing search feature within the Windows 11 snipping tool marks a significant milestone in Microsoft’s journey towards enhancing user experience and productivity. By offering users a convenient way to conduct visual searches directly from their screenshots, Microsoft is empowering users with a powerful tool that combines functionality and innovation. As this feature continues to evolve and reach a wider audience, it may modify the way users interact with images and information within the Windows environment.

This feature not only aligns with the trend of AI-driven tools but also showcases Microsoft’s commitment to innovation and user-centric design. By incorporating functionalities akin to Google Lens directly into the Snipping Tool, Microsoft is simplifying the visual search process for Windows 11 users and eliminating the need for third-party applications. This move underscores Microsoft’s dedication to enhancing the functionality of its tools and software. The company is therefore setting a precedent for future advancements in visual search technology within the Windows environment.

source
13
Arm is set to develop artificial intelligence processors for its parent company Softbank, which plans to use them in its own datacenters, reports Nikkei. This will mark a significant step in Softbank's CEO Masayoshi Son's vision to transform the company into an AI-driven conglomerate with a projected investment of 10 trillion yen ($64 billion).

The UK-based Arm will create a specialized division dedicated to AI chips, with the goal of having a prototype ready by spring 2025. Following the prototype processor in spring 2025, mass production of Arm's processors is anticipated to commence in the fall of 2025 at a contract maker of chips, such as TSMC, Samsung Foundry, or Intel.

SoftBank intends to build datacenters using its own processors across the U.S., Europe, Asia, and the Middle East by 2026. Due to the substantial power requirements of data centers, the company will reportedly also expand into power generation. Plans include the development of wind and solar power facilities, with an eye on pioneering next-generation fusion technology, Nikkei claims.

SoftBank, which owns a 90% stake in Arm, will cover the initial development expenses, expected to run into hundreds of billions of yen. Once the processor is in mass production, the AI chip business might be separated and operated under the SoftBank umbrella, reports Nikkei. Meanwhile, it is unclear whether Arm will make the design available to its clients. It is also unclear how Arm's customers will see this plan as Softbank will compete not only against developers of chips that license technology from Arm, but also against cloud companies, such as Amazon and Microsoft.

Son's broader strategy involves leveraging AI to enhance capabilities across datacenters, robotics, and power generation sectors. SoftBank's commitment is to fuse cutting-edge AI, processors, and robotics technologies to drive innovation across various industries. 

The Softbank CEO has been proactive globally, traveling to key technology hubs in Taiwan and the U.S., and meeting with industry leaders to garner support for his AI initiatives. He has emphasized the potential of artificial general intelligence to revolutionize sectors like shipping, pharmaceuticals, finance, manufacturing, and logistics.

The market for AI processors is growing rapidly and is expected to balloon from $30 billion this year to more than $100 billion by 2029, and surpassing $200 billion by 2032, according to estimates cited by Nikkei. Despite Nvidia's current leadership in the market, the company is struggling to meet surging demand for its AI processors, such as the H100, which is an opportunity for SoftBank.

source
14

Microsoft Basic Display Driver ASPEED AST2400 BMC Video

This week, we were setting up a system that uses an ASPEED BMC for video. The ASPEED BMCs are commonly used on servers and workstations and provide out-of-band management capabilities. They also offer a low-power, decades-old GPU, usually over a PCIe x1 link, that powers VGA, iKVM, and other server features. Sometimes, you set up a system with a BMC and install Windows, and the video output looks horrific with low resolution that does not work with some apps, websites, and settings. This is exactly what we did this week, and someone in the studio did not know that you can get more useful, higher-resolution output.

How to Install the ASPEED Windows 11 VGA Driver for Better Video

Upon the initial installation of Windows, the ASPEED GPU is picked up by the Microsoft Basic Display Adapter driver. Here, we can see that only 1024×768 or 800×600 resolutions are available.


Microsoft Basic Display Driver ASPEED AST2400 BMC Video

Step one is to download the ASPEED graphics driver. There is a Windows version, as well as a Linux, FreeBSD, and Solaris version. You can find that either from the server or motherboard maker or directly from ASPEED here. Downloading and extracting that driver, we get a number of options. Notably, there is even now a Windows 11 on Arm version (WIN11_ARM) but most of the versions are for x86.


ASPEED AST2400 BMC Video Driver Bundle

You can install the drivers from those individual folders, or go into the WDDM Installer. WDDM stands for Windows Display Driver Model that has been around since Windows Vista or Windows 8. The installer has a Setup Wizard that is kept up to date with Windows and Windows Server versions. Here we are using Windows 11 so we are using Win11_23H2. If you were using Windows Server 2022, you would use Win2022 and so forth.


ASPEED AST2400 BMC Video Driver WDDM Win 11 Installation

Once you have this installed, you can immediately see the increase in display output options as we now have 1920×1080 available.


ASPEED AST2400 BMC Win 11 Drivers Installed

For those hoping for a massive performance jump, this does not fix the fact that the low-power SoC uses GPU IP from eons ago, and it is usually on some low-performance PCIe link that is being shared with the rest of the BMC.

Final Words

Our big piece of advice is to install the GPU display driver if you are installing Windows or Windows Server onto a system with an ASPEED BMC with a GPU (usually the AST2xxx series.) This is something very easy to overlook with unattended installations or even just on the initial setup. It is also something that is very frustrating if you are trying to troubleshoot via an in data center KVM cart and you are trying to look at Windows Server Manager but cannot see options due to low resolution. It pays to be slightly proactive and update drivers before there is an issue. This is also very useful for those running AI servers or workstations and needs a video output that is not tied to the accelerator.

source
15
Android O.S | Apps / An awesome Android audio upgrade
« Last post by javajolt on May 12, 2024, 07:26:42 PM »
Whether you're dealing with mumblings from meetings, noises from notifications, or music from commute-time streaming, you've never experienced sound on your phone like this.


CREDIT: JR RAPHAEL/GOOGLE/BRONEARTULM

Every now and then, I come across an Android customization concept so clever, so cool, so splendidly useful that I just can’t wait to share it with you.

Today, my fellow Android-appreciating animal, is one of those days.

The concept in question is a hefty and exceptionally practical upgrade for your Android audio experience. It brings a boost to the way you interact with sound on whatever Android device you’re using, no matter who made it or how old it may be. And it’ll take you less than a minute to get going (though, if you enjoy geeking out over details as much as I do, you may find yourself fine-tuning its setup and exploring advanced options within it for a while beyond that).

I’m tellin’ ya: It’s one heck of an improvement. And unlike most of the stuff we’re bound to hear about at Google’s grand I/O gala next Tuesday, it’s something you can start using this very second — and something with an impact that’ll be immediately obvious and genuinely advantageous all throughout your day, both for professional work-related purposes and for any after-hours audio adventuring.

Ready for a whole new level of Android aural pleasure?

Meet your Android audio enhancement

The upgrade of which we speak may seem simple on the surface, but don’t be fooled: This nifty little lift will affect all aspects of your Android-using experience and make your life easier — even saving you time and increasing your efficiency — countless times a day.

It’s a completely new take on the Android volume panel — y’know, the little slider that shows up whenever you tap your phone’s physical volume keys. Unless you’re a complete and total nerd (hello!), that’s probably a part of the Android interface you haven’t spent much time thinking about. But believe you me, once you see how much of a meaningful difference this improvement introduces, you’ll wonder how you went so long without it.

Our upgrade comes by way of a thoughtfully crafted app called Precise Volume 2.0. The app essentially replaces your standard volume panel interface with a totally different, much more customizable, and delightfully feature-rich alternative. (And, yes, you’d better believe this is another one of those wonderful control-claiming superpowers that’d be possible only on Android.)

But enough with the broad blathering. Precise Volume has six especially noteworthy benefits that I’d encourage you to consider:

1. It empowers you to create all sorts of custom presets — specific sets of volume levels for media, ring and notification noises, call and alarm chimes, and even general system sounds — and then activate those with a single swift tap right from your regular volume panel pop-up.

2. It includes easy options for automation, too, so you can instantly have your phone change its volume settings in any specific way anytime a particular app is opened, anytime a specific Bluetooth or wired device is connected, or even anytime a certain day and time arrives.

3. It expands the standard system volume sliders to make ’em much more precise, with a visible zero to 100 scale that lets you get super-nuanced about the exact volume level you want for any given moment or purpose. You can even increase that scale, if you want extra control beyond that, and make your volume sliders operate on a zero to 1,000 step increment setup (or any other measure you like).

4. It includes simple equalizer settings, which can make any audio you’re hearing sound noticeably better and can also be included in those presets and automations we just went over. These settings can even make your phone’s maximum volume higher, if you find things are occasionally too quiet.

5. It adds in a not-yet-broadly-available Android-15-style volume panel expansion that makes all your audio controls even easier to manage from anywhere.

6. And it brings that simple, standard Android design into the volume panel on any device — delivering quite an improvement over the murky mess present on phones by Samsung and other heavy-handed companies by default.


THE PRECISE VOLUME PANEL IN ITS INITIAL FORM, AT LEFT, AND FULLY EXPANDED, AT RIGHT.
Credit: JR RAPHAEL, IDG


Not bad, right? Now, there is one catch: For the full set of features, including the volume panel replacement, you’ll have to pony up six bucks as an in-app purchase for Precise Volume’s Pro version. But you can play around with some of the features even in the app’s free version. And if you like what you find, you’ll likely find that one-time purchase to be very worth its weight.

So let’s get started, shall we?

60 seconds to smarter Android audio

First things first, on the simplest possible level:

Download Precise Volume 2.0 from the Play Store.

• Open it up and accept the couple of permissions it requests. (They’re completely innocuous and required for parts of the app’s operation.)

• Explore the app’s tabs and the options within ’em to play around with the presets and other features.

For the full-fledged volume replacement panel at the heart of this conversation, meanwhile:

• Tap the Settings tab at the bottom of the Precise Volume interface.

• Tap “Volume Button Override.”

• Flip the toggle next to “Enabled,” then follow the prompts to upgrade to the app’s Pro version.

• Once that’s done, tap that toggle again, then follow the prompt to allow Precise Volume the ability to display itself over other apps. That’s needed for reasons that should be obvious, and there’s no harm in allowing it.

• Once that’s done, tap that toggle one more time — and this time, follow the prompt to enable the app as an Android accessibility service. That may sound scary, but it’s genuinely required for an app to be able to process your physical button presses in this way and effectively replace a part of the system interface. And Precise Volume is extremely up front about the exact reasons for all of its permission requirements and the fact that it doesn’t collect, store, or share any form of personal data.

   • After you select the app’s name, be sure to flip the topmost toggle to turn its accessibility service on — not the lower toggle
      to activate it as an accessibility shortcut.

   • And note that on a Samsung phone, this part of the process is unnecessarily convoluted. After selecting the option to
      enable the accessibility service, you’ll have to tap “Installed apps” and then find Precise Volume 2.0 in the list before you’ll
      see the relevant option.

And that’s it! Just head back to your home screen and then press your phone’s physical volume-up or volume-down key, and you should see the new Precise Volume panel appear in place of the standard volume pop-up. You can then get to the expanded bottom-of-screen interface by tapping the three dot icon within the regular side-of-screen panel.


THE PRECISE VOLUME PANEL IN ACTION — FROM ZERO TO 100. Credit: JR RAPHAEL, IDG

Beyond that, you’ll absolutely want to spend a bit of time in the “Manage Volume Presets” area of Precise Volume’s Settings tab. That’s where you can create those one-tap presets we talked about a minute ago.


PRECISE VOLUME’S PRESETS MAKE IT POSSIBLE TO CREATE COMPLETE AUDIO SETTINGS FOR ANY
SPECIFIC SCENARIO.
JR RAPHAEL, IDG


The “Automation” area of that same tab is where you can configure simple automations for what happens when specific apps are opened, specific devices are connected, or specific days and times occur — if, say, you want your media volume to bump up and your notification volume to go all the way down whenever you open Google Meet or maybe your notification and ring volume to bump up during the workday but then drop back down in the evenings.


PRECISE VOLUME’S AUTOMATIONS OPEN THE DOOR TO ALL SORTS OF STEP-SAVING SMARTNESS.
Credit: JR RAPHAEL, IDG


The “Behavior” section within that same tab is where you can control the precise nuance level of your volume slider, if you want to make the control even finer than the default zero to 100 scale.


MAKE YOUR VOLUME CONTROL AS NUANCED AS YOU WANT WITH PRECISE VOLUME’S “STEPS” SETTING.
Credit: JR RAPHAEL, IDG


And the Equalizer tab at the bottom of the Precise Volume app is the place where — well, y’know. All that equalizer stuff, including the volume booster, resides.


IT MAY SOUND TECHNICAL, BUT PRECISE VOLUME’S EQUALIZER AREA IS FULL OF SIMPLE,
EFFECTIVE ENHANCEMENTS. Credit: JR RAPHAEL, IDG


And there ya have it: an awesome Android audio upgrade. The power is now at your fingertips, and a smarter, more efficient, and more powerful way of interacting with audio on your phone will always be present and waiting to be called into action.

source
16
And steal your data — how to stay safe

New malware also uses compromised WordPress sites to hide its messages with hackers


(Image credit: Shutterstock)

With so much sensitive personal and financial information on our phones these days, the last thing you’d want is for hackers to find a way to add a backdoor to your Android device. Well, a new Android malware strain does just that, and it lets hackers syphon off all sorts of valuable data.

As reported by BleepingComptuer, a new Android backdoor malware named “Wpeeper” is currently making the rounds online. So far, it has been discovered on two unofficial app stores where it disguises itself as the Uptodown App Store which as you may have guessed, is another third-party app store for the best Android phones.

According to a blog post from security researchers at Tencent’s XLab, the Wpeeper malware has already managed to infect thousands of devices. At this time though, little is known about the actual scale of the operation as well as what exactly the hackers behind this malware are using all of the data it collects for.

Due to its extensive set of advanced features, Wpeeper is certainly a new Android malware to keep an eye on. Here’s everything you need to know about this new mobile threat along with some tips and tricks on how you can stay safe from malicious apps containing malware.

A backdoor to your digital life

It’s very rare that one comes across a brand new malware strain but Wpeeper appears to be just that after XLab’s researchers analyzed inside a malicious app’s APK file only to discover that it had zero detections on VirusTotal.

Another thing that sets this malware apart from other strains is that it uses compromised WordPress sites to further hide communication between infected devices and the command and control (C2) server operated by the hackers who created it. This may sound overly complicated, but it makes it harder for law enforcement to shut down the operation. Plus, disrupting the way in which data is exchanged between a single infected Android phone and the C2 server is also more difficult.

Once the Wpeeper malware makes its way onto an Android phone — most likely through a sideloaded malicious app – it can then retrieve information about the infected device, gather a list of all apps installed on it, download arbitrary files, retrieve info about specific files and directories on the device, download files and execute them, update the malware and even delete it outright to leave no trace it was ever there.

We’ll likely find more about the malware itself and what the hackers behind it are trying to achieve once more security researchers start looking into things. Until then though, there are still some steps you can take to avoid a Wpeeper infection.

How to stay safe from Android malware


(Image credit: Google)

In order to avoid coming down with a nasty malware infection on your Android phone, the first and simplest thing you can do is to avoid sideloading apps altogether. Sure, it may be convenient and some apps actually need to be sideloaded to work at all, but the majority of people will be able to find exactly what they’re looking for on first-party app stores like the Google Play Store, Samsung Galaxy Store or the Amazon Appstore.

The reason you don’t want to sideload apps is that they don’t go through the same rigorous security checks that apps hosted on official stores do. As a result, malware embedded in these apps could easily slip through the cracks.

From here, you’re going to want to make sure that you have Google Play Protect enabled on your Android smartphone. It comes pre-installed on most phones with the Play Store and it’s really useful for fighting off malware thanks to its ability to scan all of your existing apps and any new ones you download for viruses. Likewise, you can also install one of the best Android antivirus apps for additional protection and extra features to help keep you safer online.

As long as people keep sideloading apps and using third-party app stores, hackers will likely continue using both app installation methods as a means to spread dangerous malware. This is why it’s up to you to carefully scrutinize and check every app you install on your smartphone. It may be tedious to do so but this sure beats coming down with a nasty malware infection or letting hackers install a backdoor on your phone.

source
17
Mac OS X / Mac and MacBook hit with 'Cuckoo' malware stealing sensitive data
« Last post by javajolt on May 12, 2024, 06:37:54 PM »
What you need to know about this new threat targeting Apple computers running macOS

Apple’s macOS is making headlines once again for a new type of malware attack stealing files from its target's computer.

These files can hold sensitive information, which can then be used to commit further crimes once the perpetrator gets access to them.

If you own an Apple device running macOS on an Intel or ARM silicon chip, here's what you need to know.


MacBook Pro

What we know about the 'Cuckoo' malware

The 'Cuckoo' malware, as it's been named by the security provider Kandji, is a new type of malware that meticulously searches for files linked to specific applications on your Mac or MacBook to extract as much data as possible. It is designed to gather a wide array of information, including hardware details, active processes, applications, and more installed on your system.

Additionally, Cuckoo can capture screenshots and access data from various sources, such as sensitive iCloud Keychains, Apple Notes, web browsers and popular communication apps like Discord, Telegram, Steam, and cryptocurrency wallets.


A hacker using a Mac. (Kurt "CyberGuy" Knutsson)

How does it work?

Cuckoo is distributed via malicious websites that promote a supposed tool for ripping music from streaming services and converting these into .MP3 files. This tool is offered in free and paid versions, tempting users to download and install it. Once installed, the malware relies on annoying and persistent pop-ups using LaunchAgent, a method used in other malware campaigns like XLoader.

Who is behind Cuckoo?

No one threat actor has taken responsibility for the malware campaign. Still, it's worth noting that Cuckoo refuses to operate if the device is located in certain countries — like Kazakhstan, Russia, Belarus, Ukraine and Armenia — which could mean it's coming from a group in one of these countries or operating out of this region as a whole.

However, The Hacker News reported that "each malicious application contains another application bundle within the resource directory," the researchers said. Translation: A bunch of bad stuff is found wrapped inside another wad of bad stuff.


A person using a Mac. (Kurt "CyberGuy" Knutsson)

How to keep yourself safe from malware attacks

So, how do you keep yourself safe from this malware attack and other threats targeting our technology running macOS? After all, they can be sophisticated and sneaky, making it hard to recognize even when it's right in front of you. Not to worry, that’s why I’m here. They don’t call me the CyberGuy for nothing. I’ve got you covered. Here are 9 steps to enhance your cybersecurity and safeguard your digital life:

1. Use good antivirus software: Install and maintain reliable antivirus protection tailored for macOS. The best way to protect yourself from clicking malicious links that install malware that may get access to your private information is to have antivirus protection installed on all your devices. This can also alert you of any phishing emails or ransomware scams. Ensure it is set to update automatically and run regular scans. Get my picks for the best 2024 antivirus protection winners for your Windows, Mac, Android & iOS devices.

2. Don’t get software from strangers: Always download software from reputable and official sources. Avoid downloading applications from third-party websites or links found in unsolicited emails and messages.

3. Check the software maker’s credentials: Before installing any software, check the developer's credentials and read reviews to ensure their legitimacy. This is particularly important for software that handles sensitive information.

4. Stay fresh. Perform regular updates: Keep your macOS and all installed applications up to date. Software updates often include patches for security vulnerabilities that malware could exploit.

5. Enable firewall: Use macOS’ built-in firewall or a third-party firewall to monitor incoming and outgoing connections. Turning it on can make you safer by helping detect and block malicious activity.

6. Be wary of strange requests: Be cautious about unsolicited requests to access your computer or install software, especially those from pop-ups or unfamiliar emails. The rule I live by is that if you did not ask for it, then never engage or reply. This makes it harder for a criminal hacker to gain access to your life.

7. Use strong passwords and 2FA: Enable two-factor authentication to enhance overall security.

8. Backup your data: Regularly back up important data to an external drive and/or a cloud-based service. This helps ensure that you can recover your data in case of a malware attack. It may also be a good idea to keep any sensitive files on your hard drive as well, to make it harder for the hacker to get their hands on your precious data. I routinely plug in a portable USB drive to my computer, back it important files, photos and records, unplug it and stash in a safe spot at home.

9. Create strong passwords: Use unique passwords for different accounts and consider using a password manager to keep track of them. Who can remember a litany of complicated passwords?  That’s why password managers are so effective at helping you store and retrieve passwords.

source
18
Huawei again hides chip specs from prying eyes

Quad-core mystery chip with an in-built AI accelerator emerges.


(Image credit: OrangePi)

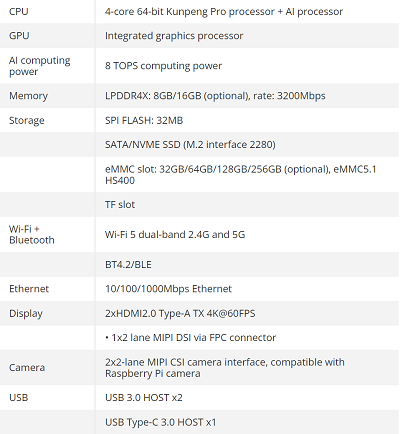
Huawei and OrangePi have announced a joint venture in the OrangePi Kunpeng Pro development board. The Raspberry Pi alternative runs not only a quad-core 64-bit Arm processor but also an AI processor that's integrated into the same package, but Huawei and OrangePi aren't releasing the specifics of the processor. In fact, the name of the chip has been hidden in the official renders, a practice that we've seen from Huawei in the past as it seeks to avoid prying Western eyes. However, we dug into the documentation to confirm that the chip is based on a custom Huawei Kunpeng CPU design. It features new tech that we haven't seen from Kunpeng processors before, showing that Huawei's Kunpeng line of chips is advancing into the AI realm.

The single-board computer includes tools and capabilities suitable for consumers, developers, and students. It comes with the [color-blue]openEuler OS[/color] preinstalled, along with the openGauss database and a suite of internet, productivity, and software development packages.


The OrangePi Kunpeng Pro development board (Image credit: OrangePi)

The Kunpeng Pro development board uses a custom Huawei Kunpeng CPU that's paired with an AI FPGA processor. Huawei has been under severe sanctions from the U.S. government, limiting its access to certain chips and chip-making technologies. Therefore, OrangePi and Huawei aren't revealing the specific model number of the Kunpeng CPU, but we do know that it is a quad-core ARM model.

Both the CPU and FPGA are placed in the same chip package, but it isn't clear if the CPU and FPGA are separate chiplets under the same heatspreader or if they are integrated onto the same die. Regardless of whether the FPGA and CPU reside on chiplets or the same die, this represents a new capability for Huawei's custom Kunpeng chip designs.

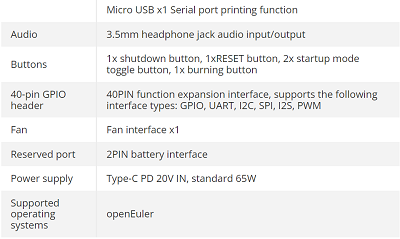
The AI processor provides 8 TOPS of AI computing power. For the sake of comparison, the Qualcomm Snapdragon X Elite and Apple M4 neural engines are rated for 45 TOPS and 38 TOPS, respectively. OrangePi and Huawei have equipped the Kunpeng Pro development board with two HDMI ports supporting 4K displays, a Type-C power interface, Wi-Fi 5, and Gigabit Ethernet.

The full specifications are:


OrangePi Kunpeng Pro is available only through Chinese retailers at this time. Pricing starts at 1,076 yuan (approximately $148.92 USD.) IT Home lists four available packages of the OrangePi Kunpeng Pro.


source
19
Linux is often the default choice for many IoT devices, but with a recent backdoor threat, we look at why an RTOS can better deliver security and minimalism.

Linux – the biggest name in open-source operating systems – is in crisis after a “trusted” contributor was discovered to have inserted a backdoor in a software package that could have resulted in a massive software supply chain attack.

This is particularly concerning for the Internet of Things (IoT) considering that Linux accounts for about 70% of all device operating systems. For developers, this infiltration suggests that Linux and its subsystems are getting so big that malicious code can be easily injected without notice. One safeguard is to return to operating system (OS) basics and other, simpler alternatives.

Let’s look at why, in this moment of cybersecurity, real-time operating systems (RTOS) are the safer bet amidst Linux’s expanding threat surface.

What just happened in Linux?

This incident marks one of the biggest ecosystem breaches in recent memory for Linux. In late March, a developer uncovered a remote code execution vulnerability in a software package part of XZ Utils, a library for compressing and decompressing files. Alerted by failing SSH logins and high CPU utilization, developers soon realized that the flaw enabled remote attackers to bypass authentication and gain complete system access.

Even more concerning? The backdoor was initiated by a “trusted” collaborator who had been working on the open-source project for several years.


It’s worth taking a step back and considering why this matters in IoT. Of course, when developing a device or system, one of the earliest and most crucial decisions developers make is deciding the type of OS. Linux is often the default choice for many devices and projects, from Android smartphones to smart TVs, thanks to its advanced memory and processing power.

However, these are two features that devices don’t always need.

The case for RTOS

The truth is that many devices don’t need to run on Linux. It’s often the industry preference, sure, but this doesn’t mean it’s the right choice. For example, running simple devices like connected doorbells on a full-fledged Linux OS would have seemed crazy a couple of decades ago due to resource constraints. Now, it’s part and parcel of modern IoT.

This hack should serve as a wake-up call that not every device warrants Linux. Basic devices like sensors or monitors – and, yes, even doorbells – usually serve one function at a time. They can therefore benefit from the resource efficiency and focused functionality of RTOS.

In Linux and other general-purpose operating systems, programs are loaded dynamically after boot, often with the ability to run in separate memory and file spaces under different user accounts. This isolation is beneficial when running multiple applications concurrently on a shared server, as one user’s programs cannot interfere with another’s, and hardware access is shared equally through the operating system.

In contrast, RTOS operates by compiling applications and tasks directly into the system with minimal separation between memory spaces and hardware. Since the primary goal of an IoT device is typically to serve a single application, possibly divided into multiple tasks, this lack of separation is not an issue. Additionally, because the application is compiled into the RTOS, it is ready to run after a very short boot and initialization process.


The ‘how-to’ process using FreeRTOS for a connected device. (Image: Amazon AWS)
This is relevant in IoT because device developers usually know two key pieces of information:

   • How many tasks will be running?

   • How much memory do these applications/processes need?

Therefore, armed with this insight, developers can determine if RTOS is a good fit. Usually, regardless of whether we’re talking about Zephyr, Azure RTOS, or Free RTOS, the ability to guarantee predictable and low-latency task execution makes these systems an attractive choice.

Additionally, Linux adds many more layers of complexity. For example, I’ve seen camera devices where developers didn’t have enough expertise to properly configure and minimize the Linux installation/distribution, leading to potential security risks. Again, selecting the right OS from the start can save unnecessary development hurdles in the long run.

A trade-off worth making

The discovery of this critical vulnerability in a core Linux package, introduced by a trusted contributor no less, demonstrates the escalating security risks facing IoT ecosystems. For developers, this incident underscores the importance of approaching OS selection with security as the top priority. While Linux offers unparalleled functionality, that power often comes at the cost of increased complexity that requires significant expertise to properly configure and harden the installation.


Every IoT device has a unique URL for automatic location over the Internet, and RTOS with an IoT
platform allows secure, authenticated, and extremely low bandwidth peer-to-peer connections to be
established even when the device is deployed behind a NAT firewall. (Image: Nabto)
On the other hand, RTOS is designed from the ground up with security and minimalism in mind. By focusing solely on executing discrete tasks with low latency, rather than multi-process and multi-user multitasking, RTOS offers a reduced attack surface with clear visibility into the limited codepaths. Moreover, since the application is compiled directly into the RTOS, and due to the nature of many microcontrollers, it is extremely difficult – if not impossible – to inject random code for execution through techniques like stack overflows. This is because the only code that can run is located in the system’s flash memory. Consequently, the compile-time integration of components further minimizes potential vulnerabilities.

Of course, RTOS by nature trades some functionality for security. But for the vast majority of IoT use cases that require simple, dedicated operation rather than multi-purpose computing, this kind of system can provide real-time performance and security essentials.

The expanding threat landscape for Linux shows that, particularly for IoT, this separation of security and functionality may be a trade-off worth making.

source
20
Huawei / Your luxury room with a home theater on wheels. Huawei Aito M9.
« Last post by javajolt on May 12, 2024, 09:48:46 AM »


Huawei Aito M9, is a large luxury crossover with a luxury interior, sports car-like acceleration,
home theater, outdoor theater, auto-doors, some of the largest screens in the industry,
headlight projection, three rows of full seats, and more.

source
Pages: 1 [2] 3 4 ... 10